get uboot U_BOOT_CMD usage

学习到一个奇淫技能,这里总结如下。方便以后工程实现。
在uboot中大量的命令交互,这些命令都对应其参数、help、和命令处理函数。
通常做法去解析参数名称后遍历每一个命令名称,选择执行。也就是通常的switch、case做法。
uboot给出了不一样的操作。
先看uboot怎么做。
定义命令处理函数;
static int do_version(struct cmd_tbl *cmdtp, int flag, int argc,
              char *const argv[])
{
    char buf[DISPLAY_OPTIONS_BANNER_LENGTH];

    printf(display_options_get_banner(false, buf, sizeof(buf)));
#ifdef CC_VERSION_STRING
    puts(CC_VERSION_STRING "\n");
#endif
#ifdef LD_VERSION_STRING
    puts(LD_VERSION_STRING "\n");
#endif
#ifdef CONFIG_SYS_COREBOOT
    printf("coreboot-%s (%s)\n", lib_sysinfo.version, lib_sysinfo.build);
#endif
    return 0;
}
申明该命令;
U_BOOT_CMD(
    version,    1,        1,    do_version,
    "print monitor, compiler and linker version",
    ""
);
之后对于对应console 键入命令version就能够查找到该命令处理函数 do_version 执行。
接下来,剖析背后细节。
对于do_version通过U_BOOT_CMD完成了函数申明。
#define U_BOOT_CMD(_name, _maxargs, _rep, _cmd, _usage, _help)        \
U_BOOT_CMD_COMPLETE(_name, _maxargs, _rep, _cmd, _usage, _help, NULL)#define U_BOOT_CMD_COMPLETE(_name, _maxargs, _rep, _cmd, _usage, _help, _comp) \
ll_entry_declare(struct cmd_tbl, _name, cmd) = \
U_BOOT_CMD_MKENT_COMPLETE(_name, _maxargs, _rep, _cmd, \
_usage, _help, _comp);#define ll_entry_declare(_type, _name, _list) \
_type _u_boot_list_2_##_list##_2_##_name __aligned(4) \
__attribute__((unused, \
section(".u_boot_list_2_"#_list"_2_"#_name)))#define U_BOOT_CMD_MKENT_COMPLETE(_name, _maxargs, _rep, _cmd, _usage, \
_help, _comp) \
{ #_name, _maxargs, NULL, 0 ? _cmd : NULL, _usage, \
_CMD_HELP(_help) _CMD_COMPLETE(_comp) }#ifdef CONFIG_AUTO_COMPLETE
# define _CMD_COMPLETE(x) x,
#else
# define _CMD_COMPLETE(x)
#endif
#ifdef CONFIG_SYS_LONGHELP
# define _CMD_HELP(x) x,
#else
# define _CMD_HELP(x)
#endif最终U_BOOT_CMD申明定义了结构体类型为cmd_tbl 的变量_u_boot_list_2_cmd_2_version 并且完成了该命令的初始化赋值。
struct cmd_tbl _u_boot_list_2_cmd_2_version
__aligned(4) __attribute__((unused, section(".u_boot_list_2_""cmd""_2_""version")))
= {
    "version",
    1,
    NULL,
    0 ? do_version : NULL,
    "print monitor, compiler and linker version",
};提示:对于如上宏展开,可以直接复制代码到文件,直接通过gcc -E cmd.c -o cmd.i 预处理展开操作。对于如上的变量属性操作__aligned、__attribute__参考6.35 Specifying Attributes of Types。__attribute__(4)表示改结构体变量4字节对齐,__attribute__声明该变量属性可能不会被使用,同时存储区为.u_boot_list_2_cmd_2_version。
接下来梳理命令如何查找并执行。
    /* Look up command in command table */
    cmdtp = find_cmd(argv[0]);
    if (cmdtp == NULL) {
        printf("Unknown command '%s' - try 'help'\n", argv[0]);
        return 1;
}struct cmd_tbl *find_cmd(const char *cmd)
{
struct cmd_tbl *start = ll_entry_start(struct cmd_tbl, cmd);
const int len = ll_entry_count(struct cmd_tbl, cmd);
return find_cmd_tbl(cmd, start, len);
}对于命令查找,首先是通过ll_entry_start、ll_entry_count 找到命令集合的首地址和数量,然后再通过参数名依次匹配。那么ll_entry_start和ll_entry_count然后如何确定所有命令集合的首地址和数量的呢?还是尝试把宏展开。
如上宏展开后。
struct cmd_tbl *start = ({
    static char start[0]
    __aligned(4)
            __attribute__((unused, section(".u_boot_list_2_""cmd""_1")));
    (struct cmd_tbl *) &start;
});
const int len = ({
    struct cmd_tbl *start = ({
        static char start[0]
        __aligned(4)
                __attribute__((unused, section(".u_boot_list_2_""cmd""_1")));
        (struct cmd_tbl *) &start;
    });
    struct cmd_tbl *end = ({
        static char end[0]
        __aligned(4)
                __attribute__((unused, section(".u_boot_list_2_""cmd""_3")));
        (struct cmd_tbl *) &end;
    });
    unsigned int _ll_result = end - start;
    _ll_result;
});
return find_cmd_tbl(cmd, start, len);
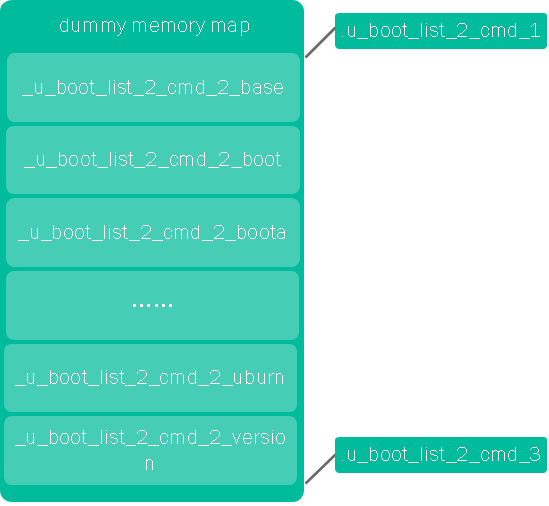
不难看出,其直接定义局部变量start、end 取变量属性为4字节对齐,存储区域为.u_boot_list_2_cmd_1和.u_boot_list_2_cmd_3地址,从而获取到所有命令集合的首地址和结束地址。

这里仍然有疑问。
如何保证
.u_boot_list_2_cmd_2_xxx存储顺序是线性的?原来在链接参数中会做添加申明:
.u_boot_list : { KEEP(*(SORT(.u_boot_list*))); }提示:将如上链接选项添加文件之后通过
-T参数指定该链接脚本。通过编译生成的map文件我们再次确认如上存储映射关系。
.u_boot_list 0x4a0a640c 0x6b8 *(SORT(.u_boot_list*)) //顺序存储。 .u_boot_list_2_cmd_1 0x4a0a640c 0x0 common/built-in.o .u_boot_list_2_cmd_2_base 0x4a0a640c 0x1c common/built-in.o 0x4a0a640c _u_boot_list_2_cmd_2_base .u_boot_list_2_cmd_2_boot 0x4a0a6428 0x1c common/built-in.o 0x4a0a6428 _u_boot_list_2_cmd_2_boot .u_boot_list_2_cmd_2_boota 0x4a0a6444 0x1c common/built-in.o 0x4a0a6444 _u_boot_list_2_cmd_2_boota //...... .u_boot_list_2_cmd_2_version 0x4a0a6a80 0x1c common/built-in.o 0x4a0a6a80 _u_boot_list_2_cmd_2_version .u_boot_list_2_cmd_3 0x4a0a6a9c 0x0 common/built-in.o 0x4a0a6a9c . = ALIGN (0x4) //4字节对齐。提示:通过链接选项
-Wl,-Map=u-boot.map生成map文件。也可以通过readelf -a读取。- 每次调用
ll_entry_start都会定义变量start,并且存储在.u_boot_list_2_cmd_1会覆盖?这里不是定义存储在
.u_boot_list_2_cmd_1结构体变量,而是定义指针类型,取该存储地址,而对于。 .u_boot_list_2_cmd_1和.u_boot_list_2_cmd_3为什么能够取其命令列表的首尾地址?现在还没有找到如上链接参数
*(SORT(.u_boot_list*)),详细说明文档,但是不难猜测这里采用了通配符u_boot_list*匹配了所有定义在该存储区域的变量和指针类型,并且按照递增数字排序,因为.u_boot_list_2_cmd_1是该存储区域的指针类型,按照该数字排序.u_boot_list_2_cmd_1取到了第一个存储变量首地址,相同地.u_boot_list_2_cmd_3取到了该存储区域的最后一个结构体变量尾地址。
最后我们总结如上操作的优势:
- 对比switch case更具灵活性,定义完处理函数后,直接在任意位置声明即可;
- 对比将所有命令参数添加至链表动态注册,可以节省一部分内存,同时也不用统一去省去注册;
有了如上编程技巧,对于基于事件驱动编程实现会更加方便。

需要注意,因为这里的函数是通过函数指针方式访问的,所以可能出现被优化的情况。
终于结题,梳理清楚了为什么会被优化,https://notes.leconiot.com/gcc_optimization.html。